Docker Port-forwarding with boot2docker it's forwarded ports all the way down
Port-forwarding from an application in Docker to a host running
boot2docker involves three OS instances and two port forwards. This
document will describe how to get a simple web application in a Docker
container to be accessible from the Mac OS X or Microsoft Windows
host.
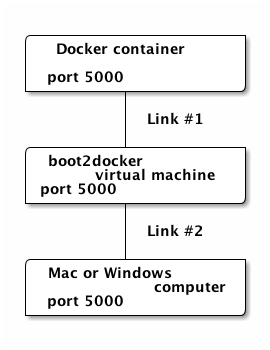
Running this on a Mac or Windows computer is a little complicated, because the Docker container is running in a VirtualBox VM, not natively on the host as it does with Linux, so there is another layer to get through to get networking working.
The Pile of Computers and Their Networks
Building an Image
Build your image with the Dockerfile that is in this directory (.)
and give it the name (or tag) acaird/flask by typing:
docker build -t "acaird/flask" .
The tag (the thing in the quotes) can be anything; see the Docker documentation for more on naming conventions, versioning, etc.
The Dockerfile looks something like:
FROM centos:centos6
MAINTAINER Andrew Caird "acaird@gmail.com"
# Apply all the updates
RUN yum update -y
# Install Apache and mod_wsgi for our Flask app
RUN yum install httpd mod_wsgi -y
# Get the new packages and python27
RUN yum install centos-release-SCL -y
RUN yum install python27 -y
# Install pip then use it to install Flask and its dependancies
RUN (. /opt/rh/python27/enable && easy_install-2.7 pip && pip install flask)
# Copy in our flask-virthost config file
COPY webserver/flask-virthost.conf /etc/httpd/conf.d/
# Copy in our flask app and templates
ADD web-app-reports.py /var/www/softwarereport/
ADD templates/  /var/www/softwarereport/templates/
# Expose Flask's default port 5000
EXPOSE 5000
CMD cd /var/www/softwarereport && . /opt/rh/python27/enable && python2.7 web-app-reports.py
The thing that matters most in this Dockerfile for the purpose of
networking is the EXPOSE 5000 line; this isn’t technically
required (more later) but I think it’s nice to keep it here for
documentation.
Getting to the port on your Mac
Now you have to get the port (port 5000, in our example) forwarded from your computer to the VirtualBox host’s port. These steps will do that:
- Open the VirtualBox GUI and select the computer called
boot2docker-vmfrom the list on the left. - Then choose Settings from the Machine menu (or press Command-S on a Mac).
- In the Settings window, choose the Network icon at the top, then click the Port Forwarding button.
- In the table that is presented, click the weird looking little
+sign on the right to add a rule. - You can name the rule anything, but type in
127.0.0.1for theHost IPcolumn, and5000in both theHost PortandGuest Portcolumns. You can leave theGuest IPfield empty.
You can do this while the boot2docker-vm image is running, if it’s
convenient for you.
Once this is done, VirtualBox will connect port 5000 on the Mac (or
Windows) computer to port 5000 on the boot2docker-vm server. This
is Link #2.
Running the Container
To start a container from the image and do the Docker container to
the boot2docker-vm host port-forwarding, type:
docker run -t -i -p 5000:5000 acaird/flask
This will start an instance, forward port 5000 between the
VirtualBox host (boot2docker-vm) and the Docker container; if your
command is /bin/bash, the -t -i options will connect you to the
shell; if you are using the Dockerfile above will show you the
output from Flask.
This is Link #1.
Also, as promised, the reason the EXPOSE command in the Dockerfile
isn’t required is that the -p 5000:5000 sets up the port
forwarding whether or not you have an EXPOSE statement; for more
see http://docs.docker.com/reference/builder/#expose
If you are running a shell (and not the exact Docker file from above), from here you can start the test Flask server by typing:
. /opt/rh/python27/enable
cd /var/www/softwarereports
python2.7 web-app-report.py
This loads the Python v2.7 environment and starts the Flask app with Python’s web server. If all went well, you should see:
* Running on http://0.0.0.0:5000/
And if everything went super well, you should be able to open a
web browser on your computer, go to http://localhost:5000 and see
your Flask app’s @app.route('/') index page.
Recap
This isn’t supposed to be a Flask tutorial, it was just a handy way
to have a server. The goal is to point out that you have to get the
port of interest forwarded twice, once from the container to the
host (which is a virtual machine) and once from the virtual machine
to the physical machine that is running boot2docker. There are
lots of ways to do this, this is only one.