A Simple Web App in Python, Flask, Docker, Kubernetes, Microsoft Azure, and GoDaddy zero-to-webapp in 58 easy steps
You’re talking with your wife one daaayyy… and realize that you could improve her life by letting her create printable calendars and importable ICS files for events she has to schedule. And that should be on the web, because while your wife is very smart, she is not very technical.
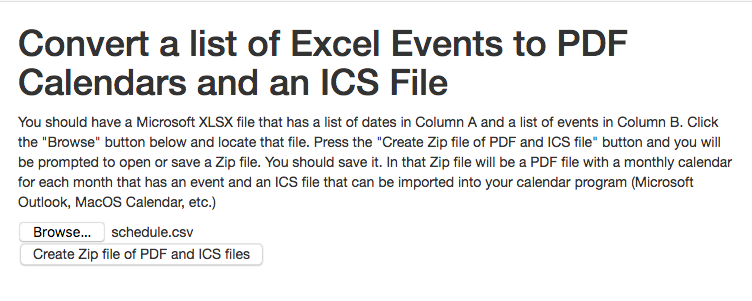
The problem is that we have a simple input and from a web site we want printable PDF calendars and an iCalendar or ICS file that can be imported into calendar programs.
The input is just a column of dates and a column of events. An example of it for scheduling people to work looks like:
| 2019-02-01 | Alicia, Michelle, Dolly |
| 2019-02-02 | Jim, Stephen, Ian, and Bernard |
| 2019-02-03 | Wayne, Daryl, Katy |
| 2019-02-04 | Alicia, Jim, Wayne |
| 2019-02-05 | closed |
| 2019-02-06 | Michelle, Stephen, Daryl |
| 2019-02-07 | Dolly, Bernard, Katy |
We will start with a Python program that can process that into printable PDF calendars and iCalendar files, then turn that into a web application using Flask. Once we have a Flask application, we will package that into a Docker container and publish it to the Docker Hub so it can be read by our cloud provider’s environment. I chose to use Microsoft’s Azure cloud environment, which uses Kubernetes to orchestrate the environment needed to instantiate our Docker container and get web traffic to it. I had a domain at GoDaddy that I wanted to use for this website, and that is the final step.
The Github project for this is at: https://github.com/acaird/xlscal-to-pdf-ics
Python
Happily for us, Python can read that file as a .csv file (csv) or
an Excel (.xlsx) file (xlrd). Even more happily, it can output
PDF files using ReportLab and iCalendar files using icalendar.
The function for generating a PDF calendar looks like:
def make_pdf_cals(events):
    buf = BytesIO()
    stylesheet = getSampleStyleSheet()
    doc = SimpleDocTemplate(buf, pagesize=letter)
    doc.pagesize = landscape(letter)
    elements = []

    months = set([d.month for d in events])
    years = set([d.year for d in events])

    for year in years:
        for month in months:
            elements.append(
                Paragraph(
                    "{} {}".format(calendar.month_name[month], year),
                    stylesheet["Title"],
                )
            )
            cal = [["Mon", "Tue", "Wed", "Thu", "Fri", "Sat", "Sun"]]
            cal.extend(calendar.monthcalendar(year, month))
            cal = fill_cal(cal, month, year, events)
            table = Table(cal, 7 * [1.25 * inch], len(cal) * [0.8 * inch])
            table.setStyle(
                TableStyle(
                    [
                        ("FONT", (0, 0), (-1, -1), "Helvetica"),
                        ("FONT", (0, 0), (-1, 0), "Helvetica-Bold"),
                        ("FONTSIZE", (0, 0), (-1, -1), 8),
                        ("INNERGRID", (0, 0), (-1, -1), 0.25, colors.black),
                        ("BOX", (0, 0), (-1, -1), 0.25, colors.green),
                        ("ALIGN", (0, 0), (-1, -1), "LEFT"),
                        ("VALIGN", (0, 0), (-1, -1), "TOP"),
                    ]
                )
            )

            elements.append(table)
            elements.append(PageBreak())

    doc.build(elements)

    pdf = buf.getvalue()

    return pdf
and the function for generating the iCalendar file looks like:
def make_ics(events):
    ical = Calendar()

    for m in sorted(events):
        event = Event()
        event.add("summary", events[m])
        event.add("dtstart", m.date())

        ical.add_component(event)

    return ical.to_ical(ical)
Once you have that, then it’s a matter of making it into a Flask app; there are lots of tutorials on the web about that and you can see the details in the final result.
Docker
Once you have a Flask app, it needs to be packaged with everything it needs to run so it is portable, and Docker is a good way to do that.
Once you have Docker installed on your system, it’s a simply matter to create a Docker image.
Create a file called
Dockerfilethat contains a Python/Flask image from the Docker Hub and adds what you need for your application. Ours looks like:FROM tiangolo/uwsgi-nginx-flask:python3.7 RUN pip install xlrd RUN pip install python-dateutil RUN pip install reportlab RUN pip install icalendar RUN pip install flask_bootstrap COPY ./app /app
Where we used Sebastián Ramírez’s image from https://github.com/tiangolo/uwsgi-nginx-flask-docker to start, then added the Python packages we need.
Lastly we copied in the contents of our
appdirectory, which contains our Python script, calledapp.pyand atemplatesdirectory with some Flask templates.Build the Docker image on your computer:
docker build -t acaird/xls2cal .
but change the
acairdto your own Docker Hub name (I think), and don’t forget the.at the end so it knows to read theDockerfilefrom the current directory.Run your Docker image locally:
docker run --rm -d --name xls2cal -p 80:80 acaird/xls2cal
changing the tag at the end to match the tag you used in step 2. The options are:
run- runs a Docker container
--rm- removes the container after it exits
-d- runs the container in the background, without this the
docker runcommand will wait in your shell --name xls2cal- gives the container a name; Docker will assign one if you don’t give it one, but it is convenient to have one
-p 80:80- sets the port on the localhost (your computer) to
80 and sends traffic to port 80 in the Docker
container; in our case, this is where
nginxis listening to send our requests touwsgiwhich will send them to our Flask application acaird/xls2cal- is the tag of the image that is to be started in the container
- Use your web browser to go to
http://localhostand make sure your web application is working in its containerized environment Once everything is working, create yourself a free Docker Hub account at https://hub.docker.com/ and log in to it from your computer by typing:
docker login
then push your image to the Docker hub:
docker push acaird/xls2cal
Azure, with a brief detour to Kubernetes
Now you have a functioning container that will run anywhere that supports Docker images, and you need a place to run it.
The canonical cloud provider is Amazon Web Services (AWS) and, for containers spefically, Fargate, but I couldn’t follow their documentation immediately, so I moved on.
The second cloud provider that might come to mind is Google and their Kubernetes Engine; Google’s documentation was good, but when I tried following their example, there were no resources:
ERROR: (gcloud.container.clusters.create) Operation [<Operation clusterConditions: [<StatusCondition code: CodeValueValuesEnum(GCE_STOCKOUT, 1)
 message: u'Try a different location, or try again later: Google Compute Engine does not have enough resources available to fulfill request: us-central1-b.'>]
 detail: u'Try a different location, or try again later: Google Compute Engine does not have enough resources available to fulfill request: us-central1-b.'
 endTime: u'2019-02-07T01:52:24.015219227Z'
 name: u'operation-1549504333886-880ea104'
 nodepoolConditions: []
 operationType: OperationTypeValueValuesEnum(CREATE_CLUSTER, 1)
 selfLink: u'https://container.googleapis.com/v1/projects/180749766837/zones/us-central1-b/operations/operation-1549504333886-880ea104'
 startTime: u'2019-02-07T01:52:13.886673043Z'
 status: StatusValueValuesEnum(DONE, 3)
 statusMessage: u'Try a different location, or try again later: Google Compute Engine does not have enough resources available to fulfill request: us-central1-b.'
 targetLink: u'https://container.googleapis.com/v1/projects/180749766837/zones/us-central1-b/clusters/xlsx-cal'
 zone: u'us-central1-b'>] finished with error: Try a different location, or try again later: Google Compute Engine does not have enough resources available to fulfill request: us-central1-b.
on searching the Internet for this error (ok, I Googled it), I found that this is not uncommon. Being impatient, I moved on.
While Microsoft is a behemoth, they are newer to the cloud world than Amazon or Google, so they were my third choice and who I ended up using.
I started with their documentation Quickstart: Deploy an Azure
Kubernetes Service (AKS) cluster using the Azure CLI. After
creating the account as instructed on that page, I installed the
command line tool for working with Azure cloud resources called az
(I do not like graphical interfaces). On my Mac, I use Brew to
install software, and the Azure command line client is available
from there (for what it’s worth, I couldn’t find Google’s CLI
there), and typing:
$ brew info azure-cli
azure-cli: stable 2.0.57 (bottled), HEAD
Microsoft Azure CLI 2.0
https://docs.microsoft.com/cli/azure/overview
/usr/local/Cellar/azure-cli/2.0.57 (22,407 files, 100.5MB) *
  Poured from bottle on 2019-02-07 at 06:45:38
From: https://github.com/Homebrew/homebrew-core/blob/master/Formula/azure-cli.rb
gives me a useful link to the docs and typing brew install
azure-cli installed the az command for me.
I then followed their instructions and ran parts of the test environment. I didn’t do all of it, because that seemed like a lot. Also, I had my own Docker image ready and waiting.
I stripped down their Kubernetes manifest file to a simpler one that looks like:
apiVersion: apps/v1
kind: Deployment
metadata:
  name: xls2cal
spec:
  replicas: 1
  selector:
    matchLabels:
      app: xls2cal
  template:
    metadata:
      labels:
	app: xls2cal
    spec:
      containers:
      - name: xls2cal
	image: acaird/xls2cal
	resources:
	  requests:
	    cpu: 100m
	    memory: 128Mi
	  limits:
	    cpu: 250m
	    memory: 256Mi
	ports:
	- containerPort: 80
---
apiVersion: v1
kind: Service
metadata:
  name: xls2cal
spec:
  type: LoadBalancer
  ports:
  - port: 80
  selector:
    app: xls2cal
This Kubernetes manifest has two main parts: the Deployment, which
describes the container and assigns a label (app: xls2cal) to it
and an Service, which exposes port 80 to a LoadBalancer, which is
provided by Azure. What you really care about is the line that
says:
image: acaird/xls2cal
because that tells Kubernetes what Docker image to run.
The general steps once you have the Kubernetes manifest above and have adjusted it to run your container are:
Log in to Azure using the Azure command line interface (CLI)
az login
Create a group:
az group create --name acaird-xls2cal --location eastus
Create a single-node Kubernetes cluster:
az aks create \
    --resource-group acaird-xls2cal \
    --name xls2cal \
    --node-count 1 \
    --generate-ssh-keys
Add the credentials for that Kubernetes cluster to your local
kubectlconfiguration:az aks get-credentials --resource-group acaird-xls2cal --name xls2cal
Check that you have a node, and learn a little about it:
kubectl get nodes -o wide
Confirm that your
kubectlis pointed at the correct context:kubectl config get-contexts
Send the Kubernetes manifest YAML file to the cluster:
kubectl apply -f xls2cal.yaml
Start checking the state of what you have created:
kubectl get pods,svc -o wide
after a while you should see the column
EXTERNAL-IPgo from saying<pending>to being populated with an IP address- Open your web browser to
http://YourAssignedExternalIP/and you should see your web application. - Do a little dance of thanks and amazement.
DNS with GoDaddy
I have my domain registered at GoDaddy, and they will also provide DNS services for hostnames in that domain.
Looking at the Azure tutorial titled Map an existing custom DNS name to Azure App Service the example in the Access DNS records with domain provider is the same as GoDaddy, which was very convenient.
To add a hostname at GoDaddy simply go to
https://dcc.godaddy.com/manage/YOURDOMAIN.TLD/dns (of course,
replacing YOURDOMAIN.TLD with your actually domain, like
mysweetdomain.biz or whatever) click “Add”, select “A” as the type
(an A record), type in the hostname of your choice, and the IP
address from above.
If you are using MacOS or Linux, you can type:
dig hostname.mysweetdomain.biz
and you will see GoDaddy’s DNS servers respond with the hostname you configured and the IP address that was assigned above.
Now you can point your web browser at http://hostname.mysweetdomain.com and you’ll see your web application.
Security
You should do your best to make sure your application is secure - it
was only a few minutes after mine was live that it was immediately
probed by an nmap scan.
Summary
You have to know a little bit about a lot of technologies to get all of this going, but none of it is rocket science, and it is all pretty independent and each one is a useful skill to know on its own:
- Learn some Python
- Learn about the Python Flask library
- Learn a little about Docker
- Learn a little about Kubernetes
- Get a Microsoft Azure account
- Buy a domain name
- Follow the Azure documentation links and tie it all together
And you’ll get a web page:
And some PDF calendars:

- python 8
- flask 2
- cloud 2
- webapp 1
- hosting 1
- web 4
- application 1
- flask 2
- docker 3
- kubernetes 1
- microsoft 1
- azure 1
- godaddy 1
- dns 1